Hey everyone, welcome to our recipe page, If you're looking for new recipes to try this weekend, look no further! We provide you only the perfect For Beginning Bakers: Maestro Focaccia recipe here. We also have wide variety of recipes to try.
Before you jump to For Beginning Bakers: Maestro Focaccia recipe, you may want to read this short interesting healthy tips about {The Basics of Being Healthy. Getting A Healthy Eater
Are you wanting to lose weight or just improve your health? If you are, you will want to have a close look at your eating habits. Watching the foods which you consume and the fat and calories you take in is a wonderful way to keep on a happy and healthy course.
As significant as eating healthy is to losing weight and staying healthy, it can be tough to do. Eating healthy is often the hardest when dining out. Lunch menus are often stocked full of enticing pictures, but frequently missing from them is the significant information, including total calories and fat. For that reason, you might find it tough to make healthy decisions from a lunch menu.
The very first step in making healthy choices from a dinner menu is picking your location wisely. When you’ve got multiple options, when wanting to flake out, it is imperative that you give each alternative a quick examination. Though fast food institutions have started to incorporate healthy foods and foods into their menus, you might find it easier to eat healthy at a traditional family restaurant. The exact same can be said for all you can eat buffets, they are usually stocked full of suitable foods, not necessarily healthy foods.
You could also make healthy choices from a lunch menu by searching for a healthy eating area. As the foods that we eat are still a controversy surrounded by disagreement, most restaurants have begun developing healthy eating divisions on their menus. These segments are usually filled with low calorie meals and side dishes, in addition to those that are low in fats or saturated fats.
Using your best judgment is just another one of many ways which you are able to make healthy choices from a lunch menu. This is best done by examining meal pictures on a single menu. It is also recommended that you avoid foods overrun with broccoli, cheese and even sour cream. If your selection contains these fattening condiments, then be sure to ask for a reduced amount.
Talking of asking for a lesser amount, you might want to ask any questions that you have. Would you like to know whether the restaurant includes low fat milk, sour cream, or mayonnaise? You won’t need to assume they dotherefore, you will want to request your server. In reality, you can also need to inquire about carbs and fatloss. But this information is not always easily available to customers.
Even if after taking the above mentioned approaches, you’re not able to locate satisfying healthy meals in your lunch menu, you might want to purchase a healthy side dish or drink. Water is a great alternative, especially when compared to soda. Salads make great side dishes, particularly those that are consumed with no salad dressing or low-fat salad dressing. Needless to say, you might want to take more measures to make certain you decide on a healthy mealbut should you choose to forgo low calories for taste, require additional actions to make certain that you receive some nutrition.
We hope you got benefit from reading it, now let’s go back to for beginning bakers: maestro focaccia recipe. To cook for beginning bakers: maestro focaccia you only need 5 ingredients and 40 steps. Here is how you achieve it.
The ingredients needed to prepare For Beginning Bakers: Maestro Focaccia:
- Use 250 grams Bread (strong) flour
- Use 5 grams Salt
- Take 5 grams Dry yeast
- Provide 20 ml Extra virgin olive oil
- Get 175 ml 40°C hot water
Steps to make For Beginning Bakers: Maestro Focaccia:
- Place the bread flour in a bowl and create a well in the center. Add the dry yeast into the well. Place the salt around the edges of the flour. If using a bread maker, place all of the ingredients into the machine.
- Pour the hot water vigorously into the well in the flour from Step 1.
- Use a spatula or your hands to easily gather the dough together. Create another hole in the center.
- Pour the extra virgin olive oil into the hole from Step 3 and use your hands to mix it all together.
- When the dough has gathered together to become one mass, use the palms of your hand to push down on the top of the dough. Pull it back into a ball and then push it out again. Do this for 5 minutes in a bowl to hand knead the dough.
- Place the dough from Step 5 onto a surface for kneading. From here you will need to put in a little work. But once you get used to it, it will be easier. Please do your best in the beginning.
- There are many different ways and preferences that people have for kneading dough and no one way is correct. I just used the method that was written in the cookbook.
- I usually use my dominant hand to grip the dough and then use all the force of my palm to push it out to the opposite side. The photos from Steps 8-11 use a different bread dough.
- Casually grasp the stretched out dough once again with one hand and use the force of your wrist to slap it down from about 30 cm high.
- When you slap the dough down onto the surface, do not let go of it. It's difficult to understand, but it should be similar to a yo-yo.
- If you let the dough escape from your hand when throwing it down in Step 9, it will seem like it's being kneaded but it will take lots of time and the dough will never become smooth.
- Knead the dough using whatever method you like best 100 times. Rather than keeping count of how many times it's kneaded, knead until the dough no longer sticks to your hand.
- The dough will become smooth and when you stretch it out very thinly it will be like a thin translucent membrane. This will prove that the dough has finished being kneaded.
- The chef from the cookbook says "the dough will release the gluten and will naturally unstick from your hand. It will easily gather up into one mass."…
- The chef says that this will take just 10 minutes, but the first time I tried, it took about 20 minutes. But now that I've remembered how to do it and learned the techniques, I can do it in 10 minutes.
- Let the kneaded dough carry out its first rising. Spread some extra virgin olive oil (not listed in the ingredients) around the surface of a bowl and place the rounded ball of dough in the bowl. Cover with plastic wrap.
- I use my oven's bread rising function, which is for 30-40 minutes at 38°C. But you could also place the dough in a warm location where it won't dry out.
- After the dough has risen, it will become 2x the original size. Rather than paying attention to how long it takes, I think it's better to judge it based on how much it has risen.
- Punch the center of the dough with a clenched fist to release the gas. Just once is fine.
- Round the dough from Step 19 into balls the size of the focaccia you will be making. Place the seam end on the bottom.
- I divided the dough into 315 g and 140 g. If you use a 20 cm Staub cast iron skillet, you can use 310 - 330 g.
- Prepare for the second rising. If cooking the dough in a pan, grease the pan well with extra virgin olive oil beforehand.
- Place the dough in the pan from Step 22 and flatten it out with the palm of your hand. If you flatten the dough out using a rolling pin like in Step 25, it will be very neat.
- You can use any size pan, cake mold, etc. This photo shows the Staub round cocotte/10 cm with 110 g of dough.
- If not using a mold to make the focaccia, place the dough from Step 20 on a sheet of parchment paper and simply flatten it out and shape it using a rolling pin.
- Let the dough from Step 25 rise a second time. I don't have any special equipment so I just covered it with a large plastic bag and lightly sprayed it with water.
- Let the dough from Steps 23 and 24 rise a second time following the same points as the first rising. During the spring and summer you can leave it out and let it rise for about 30 minutes.
- Use your finger to push in some somewhat deep holes in the surface of the dough. Fill the holes with lots of extra virgin olive oil (not listed in the ingredients).
- According to the chef, you should cover it with so much olive oil that you'll think it's too much!!
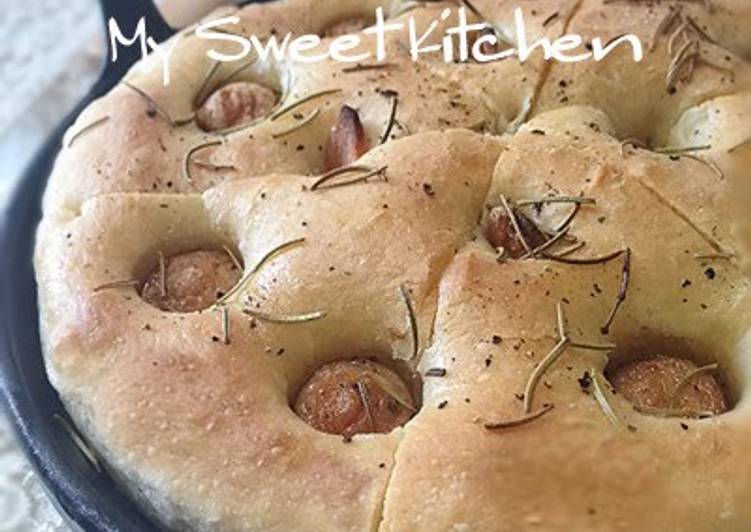
- Place your choice of ingredients into the holes. I used chorizo and garlic chips this time. Then I sprinkled it with rosemary and black pepper.
- I didn't add anything to the dough from Step 25. I only sprinkled it with rock salt and black pepper. I recommend using Krazy Salt or your favorite herbs.
- Bake the dough from Steps 30 and 31 in an oven at 190 - 200°C for 15-20 minutes. The photo in Step 31 is 230 g of dough.
- I baked the 315 g of dough in Step 30 at 200°C for 18 minutes.
- The chef said to bake it at 180°C but the strength of a professional oven vs. a household oven is somewhat different, so 190 - 200°C is fine.
- The surface will be crispy and the center will be fluffy. It is so delicious. And definitely professional-style!! The flavor of bread from the store is nothing compared to this.
- I baked this bread in a 20 cm Staub cast iron skillet which is 4 cm deep.
- I actually used garlic oil instead of olive oil for the bread with chorizo + garlic chip and rosemary + black pepper toppings.
- If you use garlic oil instead of olive oil, the garlic chips will go very well with the baked focaccia. I recommend doing this.
- This is the focaccia that I made the very first time when I didn't know a thing about baking homemade bread. This one was made with rosemary and olives.
- This is the cross-section. Even though this was the first time I ever bought dry yeast and the first time I ever hand kneaded dough, it came out fluffy and delicious.
The floral designs are inspired by Vincent van Gogh. Our focaccia has a moist but airy crumb sandwiched between thin but ultra-crunchy top and bottom crusts, thanks to a generous amount of olive oil. Focaccia is a classic italian flatbread. It can be kept plain with just a bit of olive oil and salt sprinkled over the top before baking, or it can be topped with My favorite is Focaccia al rosmarino which just means it has fresh rosemary sprinkled over the top. Some people also use this bread as the base for.
If you find this For Beginning Bakers: Maestro Focaccia recipe helpful please share it to your close friends or family, thank you and good luck.